One of the reasons we use Blue Pearl’s Visual Verification™ Suite is to enter simulation and synthesis with a better quality of code. Improved code quality means we have identified and addressed coding standard violations, structural logic issues, long combinatorial paths and of course, clock domain crossing issues.
To ensure the same quality across several modules and projects we need to ensure each project and module is subject to the same design checks. This is where creating a “custom package” comes in very handy.
Within a custom package we can group together all the relevant design checks and then use the package each time Analyze RTL™ or CDC is run. Typically, we will base the custom package on our own development rules and guidelines, also known as coding standards.
Let’s look at how we can create and use a custom package using Blue Pearl Software Tcl commands. The Tcl script will be loaded when Visual Verification Suite starts, configuring the packages and checks we desire to be run.
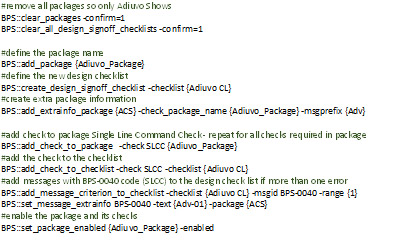
Creating a script is easy and can be achieved in just a few lines of code as you can see in the completed code snippet below.
The Tcl script will initially clear all the existing packages and design signoff checklists such that the only package which appears in the Design Checks window is the one we are going to create in a few lines time. To do this we use the Tcl commands BPS::clear_packages and BPS::clear_all_design_signoff_checklists.
The second step is to define the new package and design signoff checklist, though to run the design signoff checklist a Management Dashboard license is required. In this case I am creating a package called Adiuvo Package using the Tcl commands BPS::add_package {Adiuvo Package} and a check list called Adiuvo CL with the command BPS::create_design_signoff_checklist -checklist {Adiuvo CL}.
Once the new package and checklist have been declared we can enable the design checks, while also adding these checks to the newly created checklist. In this example, for simplicity the package contains only a single check so there is only a single command on each line.
The completed Tcl is shown below:
Tcl Script
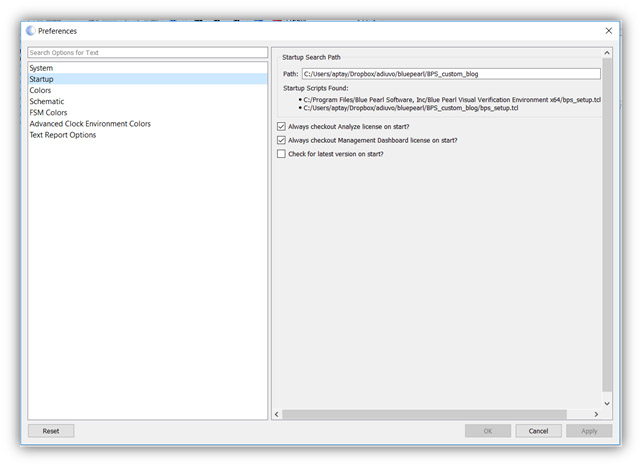
To use the Tcl script that we have just created, we need to rename it to bps_setup.tcl, and set the startup search path to include the directory where our bps_setup.tcl script is contained.
We set the startup search path in the preferences, once we set this to our Tcl file, we can restart.
When suite restarts up, you will see in the message window the new Tcl script being loaded.

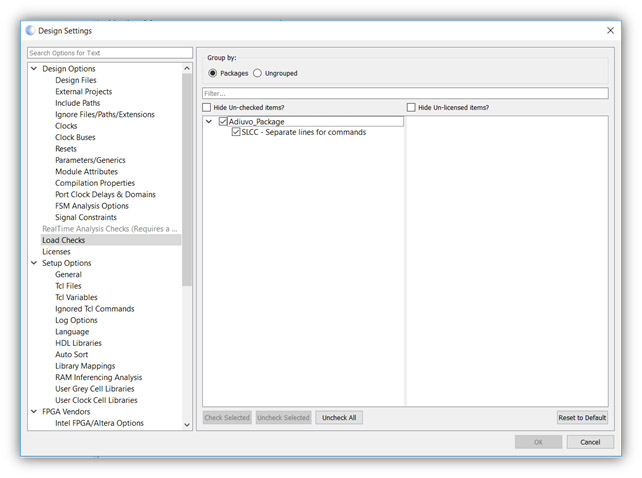
Once it has finished loading, if we open the design settings window, viewing the load checks will show the Adiuvo Package and the check which was enabled as part of it.
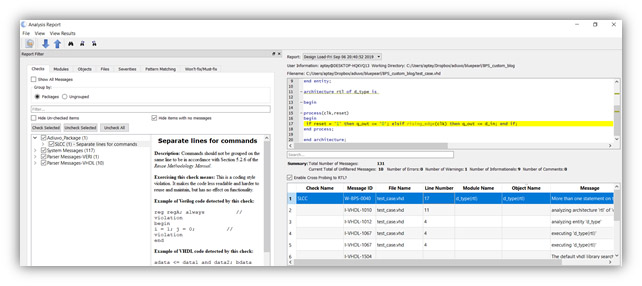
Running this check package against, a test case will result in the warning below being issued, as you would expect.
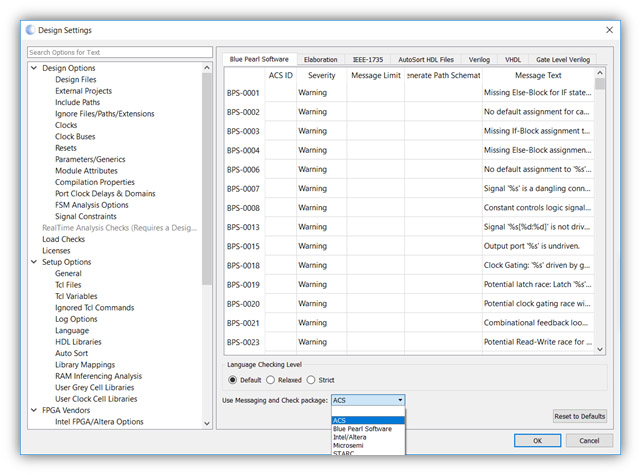
You will notice that there are no extra warnings associated with the Adiuvo Package. This is because we have not yet enabled the messaging and check package. We can do this in the Design Settings à Messaging page, from the drop-down tab select the ACS package which is the name of the extra info package we created in the Tcl script. We can also add this into the Tcl script using BPS::set_msg_check_package command.
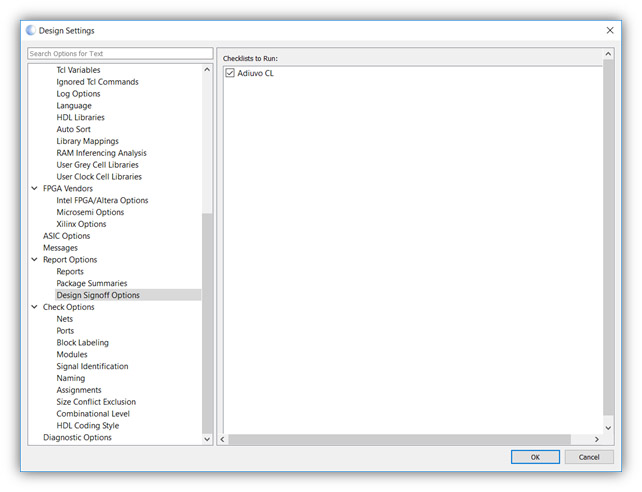
We also need to enable the checklist we previously created. Enabling the checklist will provide a detailed design sign off report along with providing more information for Management Dashboard. This can be achieved via the Design Settings à Report Options à Design Signoff Options page.
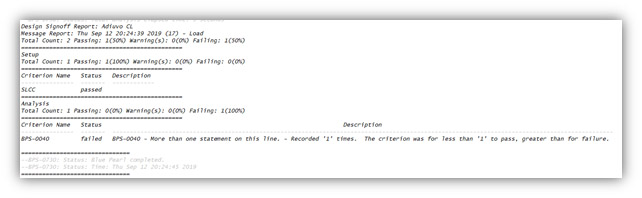
When we rerun the design analysis again with this message package and check list enabled. In the main window we will see the design sign off report indicating a failure of the SLCC check.
If we open a Management Dashboard, we will see on the Design SignOff tab the Adiuvo checklist was enabled to run and all the checks contained within it were also enabled to run. While the actual results show, an issue was found.
Providing information on both the Design Signoff setup along with the actual results is very important. If a check is reported as having zero issues it can mean either the test found no issues, or the test was not enabled. As such the checklist setup information allows us to demonstrate the test was enabled preventing inadvertent indication that no issues are present.

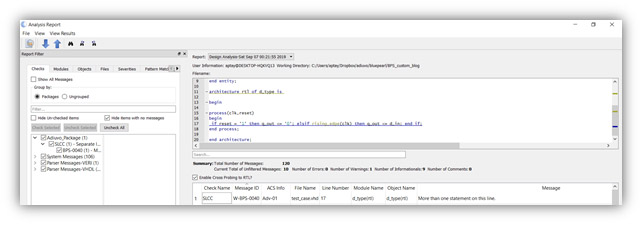
Investigating further when we open the results view, we will see an additional column in the results with the exact ACS messages from our new package.
Now we know how we can create custom packages of checks which align with our design rules and are reported via custom checklists. We also know how to use the extra message info to add specific information about how the design check relates to our design rules easing any corrective actions.
You can find the example files here https://github.com/ATaylorCEngFIET/BluePearl_VVS